React has revolutionized the best way we take into consideration UI elements and state
administration in UI. However with each new function request or enhancement, a
seemingly easy part can shortly evolve into a posh amalgamation
of intertwined state and UI logic.
Think about constructing a easy dropdown checklist. Initially, it seems
easy – you handle the open/shut state and design its
look. However, as your software grows and evolves, so do the
necessities for this dropdown:
- Accessibility Assist: Making certain your dropdown is usable for
everybody, together with these utilizing display readers or different assistive
applied sciences, provides one other layer of complexity. That you must handle focus
states,ariaattributes, and guarantee your dropdown is semantically
appropriate. - Keyboard Navigation: Customers shouldn’t be restricted to mouse
interactions. They could wish to navigate choices utilizing arrow keys, choose
utilizingEnter, or shut the dropdown utilizingEscape. This requires
further occasion listeners and state administration. - Async Information Issues: As your software scales, possibly the
dropdown choices aren’t hardcoded anymore. They could be fetched from an
API. This introduces the necessity to handle loading, error, and empty states
throughout the dropdown. - UI Variations and Theming: Totally different components of your software
would possibly require completely different types or themes for the dropdown. Managing these
variations throughout the part can result in an explosion of props and
configurations. - Extending Options: Over time, you would possibly want further
options like multi-select, filtering choices, or integration with different
kind controls. Including these to an already complicated part might be
daunting.
Every of those concerns provides layers of complexity to our dropdown
part. Mixing state, logic, and UI presentation makes it much less
maintainable and limits its reusability. The extra intertwined they grow to be,
the more durable it will get to make modifications with out unintentional negative effects.
Introducing the Headless Element Sample
Going through these challenges head-on, the Headless Element sample affords
a approach out. It emphasizes the separation of the calculation from the UI
illustration, giving builders the facility to construct versatile,
maintainable, and reusable elements.
A Headless Element is a design sample in React the place a part –
usually inplemented as React hooks – is accountable solely for logic and
state administration with out prescribing any particular UI (Consumer Interface). It
offers the “brains” of the operation however leaves the “appears” to the
developer implementing it. In essence, it affords performance with out
forcing a specific visible illustration.
When visualized, the Headless Element seems as a slender layer
interfacing with JSX views on one facet, and speaking with underlying
information fashions on the opposite when required. This sample is especially
useful for people searching for solely the habits or state administration
side of the UI, because it conveniently segregates these from the visible
illustration.

Determine 1: The Headless Element sample
As an example, think about a headless dropdown part. It might deal with
state administration for open/shut states, merchandise choice, keyboard
navigation, and so forth. When it is time to render, as a substitute of rendering its personal
hardcoded dropdown UI, it offers this state and logic to a baby
operate or part, letting the developer determine the way it ought to visually
seem.
On this article, we’ll delve right into a sensible instance by setting up a
complicated part—a dropdown checklist from the bottom up. As we add extra
options to the part, we’ll observe the challenges that come up.
Via this, we’ll display how the Headless Element sample can
handle these challenges, compartmentalize distinct considerations, and support us
in crafting extra versatile elements.
Implementing a Dropdown Checklist
A dropdown checklist is a standard part utilized in many locations. Though
there is a native choose part for primary use circumstances, a extra superior
model providing extra management over every possibility offers a greater person
expertise.
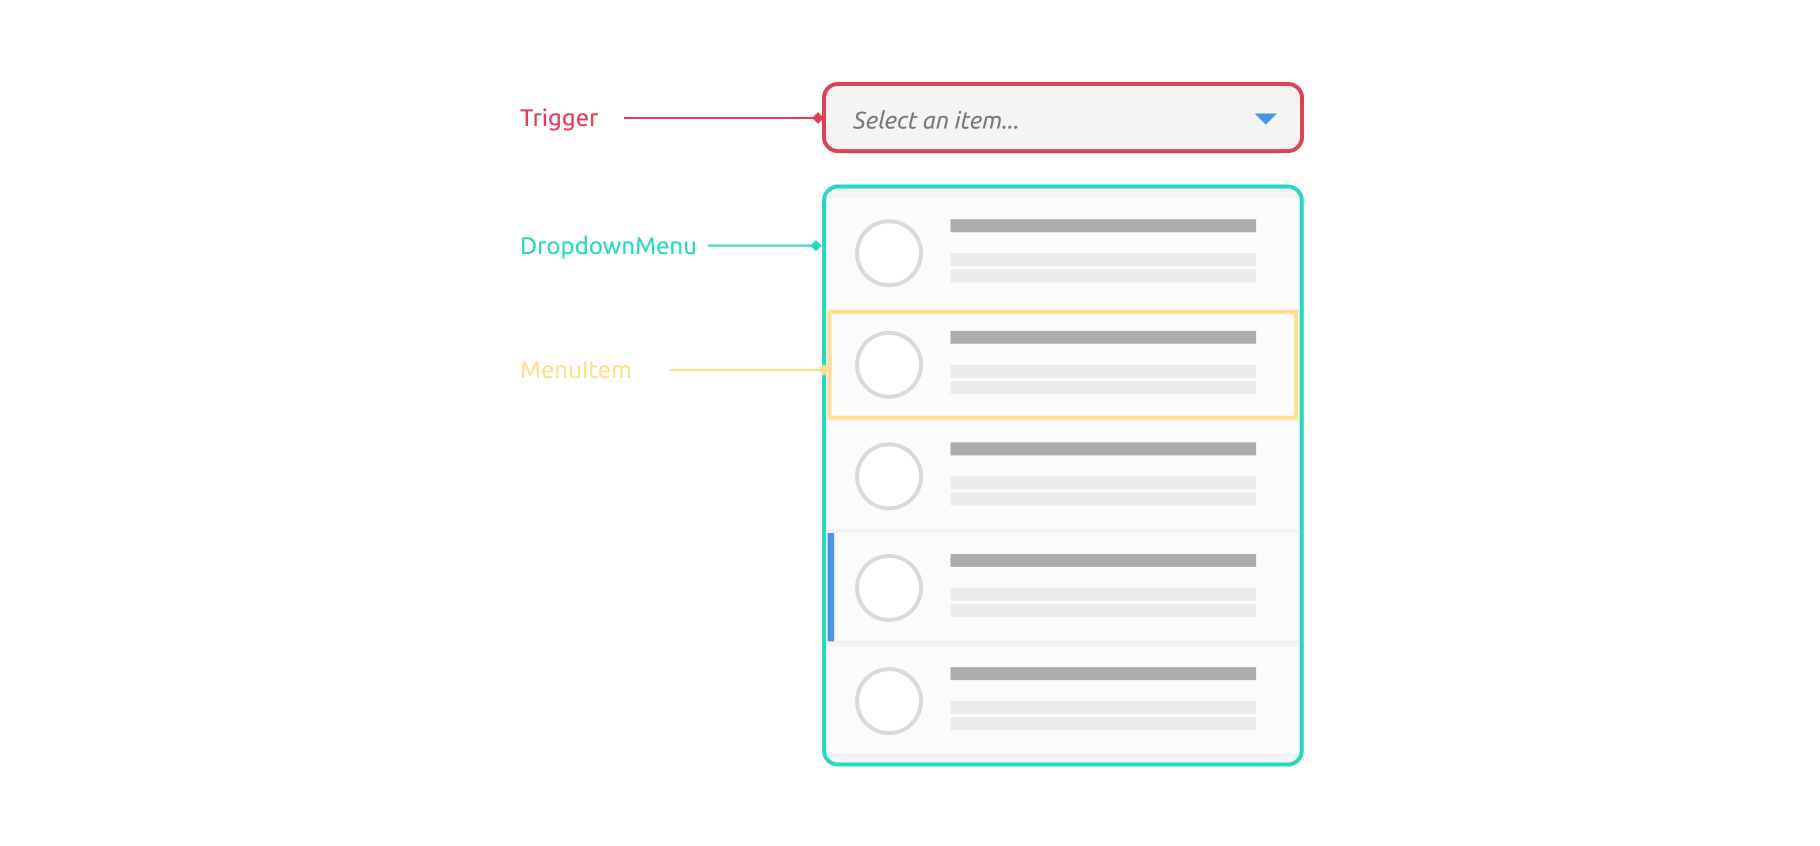
Determine 2: Dropdown checklist part
Creating one from scratch, an entire implementation, requires extra
effort than it seems at first look. It is important to contemplate
keyboard navigation, accessibility (as an example, display reader
compatibility), and value on cellular gadgets, amongst others.
We’ll start with a easy, desktop model that solely helps mouse
clicks, and steadily construct in additional options to make it life like. Notice
that the aim right here is to disclose just a few software program design patterns somewhat
than educate how you can construct a dropdown checklist for manufacturing use – really, I
don’t advocate doing this from scratch and would as a substitute counsel utilizing
extra mature libraries.
Mainly, we want a component (let’s name it a set off) for the person
to click on, and a state to manage the present and conceal actions of an inventory
panel. Initially, we disguise the panel, and when the set off is clicked, we
present the checklist panel.
import { useState } from "react";

interface Merchandise {
  icon: string;
  textual content: string;
  description: string;
}

kind DropdownProps = {
  gadgets: Merchandise[];
};

const Dropdown = ({ gadgets }: DropdownProps) => {
  const [isOpen, setIsOpen] = useState(false);
  const [selectedItem, setSelectedItem] = useState<Merchandise | null>(null);

  return (
    <div className="dropdown">
      <div className="set off" tabIndex={0} onClick={() => setIsOpen(!isOpen)}>
        <span className="choice">
          {selectedItem ? selectedItem.textual content : "Choose an merchandise..."}
        </span>
      </div>
      {isOpen && (
        <div className="dropdown-menu">
          {gadgets.map((merchandise, index) => (
            <div
              key={index}
              onClick={() => setSelectedItem(merchandise)}
              className="item-container"
            >
              <img src={merchandise.icon} alt={merchandise.textual content} />
              <div className="particulars">
                <div>{merchandise.textual content}</div>
                <small>{merchandise.description}</small>
              </div>
            </div>
          ))}
        </div>
      )}
    </div>
  );
};
Within the code above, we have arrange the essential construction for our dropdown
part. Utilizing the useState hook, we handle the isOpen and
selectedItem states to manage the dropdown’s habits. A easy click on
on the set off toggles the dropdown menu, whereas choosing an merchandise
updates the selectedItem state.
Let’s break down the part into smaller, manageable items to see
it extra clearly. This decomposition is not a part of the Headless Element
sample, however breaking a posh UI part into items is a helpful
exercise.
We are able to begin by extracting a Set off part to deal with person
clicks:
const Set off = ({
  label,
  onClick,
}: {
  label: string;
  onClick: () => void;
}) => {
  return (
    <div className="set off" tabIndex={0} onClick={onClick}>
      <span className="choice">{label}</span>
    </div>
  );
};
The Set off part is a primary clickable UI component, taking in a
label to show and an onClick handler. It stays agnostic to its
surrounding context. Equally, we will extract a DropdownMenu
part to render the checklist of things:
const DropdownMenu = ({
  gadgets,
  onItemClick,
}: {
  gadgets: Merchandise[];
  onItemClick: (merchandise: Merchandise) => void;
}) => {
  return (
    <div className="dropdown-menu">
      {gadgets.map((merchandise, index) => (
        <div
          key={index}
          onClick={() => onItemClick(merchandise)}
          className="item-container"
        >
          <img src={merchandise.icon} alt={merchandise.textual content} />
          <div className="particulars">
            <div>{merchandise.textual content}</div>
            <small>{merchandise.description}</small>
          </div>
        </div>
      ))}
    </div>
  );
};
The DropdownMenu part shows an inventory of things, every with an
icon and an outline. When an merchandise is clicked, it triggers the
supplied onItemClick operate with the chosen merchandise as its
argument.
After which Throughout the Dropdown part, we incorporate Set off
and DropdownMenu and provide them with the mandatory state. This
method ensures that the Set off and DropdownMenu elements stay
state-agnostic and purely react to handed props.
const Dropdown = ({ gadgets }: DropdownProps) => {
  const [isOpen, setIsOpen] = useState(false);
  const [selectedItem, setSelectedItem] = useState<Merchandise | null>(null);

  return (
    <div className="dropdown">
      <Set off
        label={selectedItem ? selectedItem.textual content : "Choose an merchandise..."}
        onClick={() => setIsOpen(!isOpen)}
      />
      {isOpen && <DropdownMenu gadgets={gadgets} onItemClick={setSelectedItem} />}
    </div>
  );
};
On this up to date code construction, we have separated considerations by creating
specialised elements for various components of the dropdown, making the
code extra organized and simpler to handle.
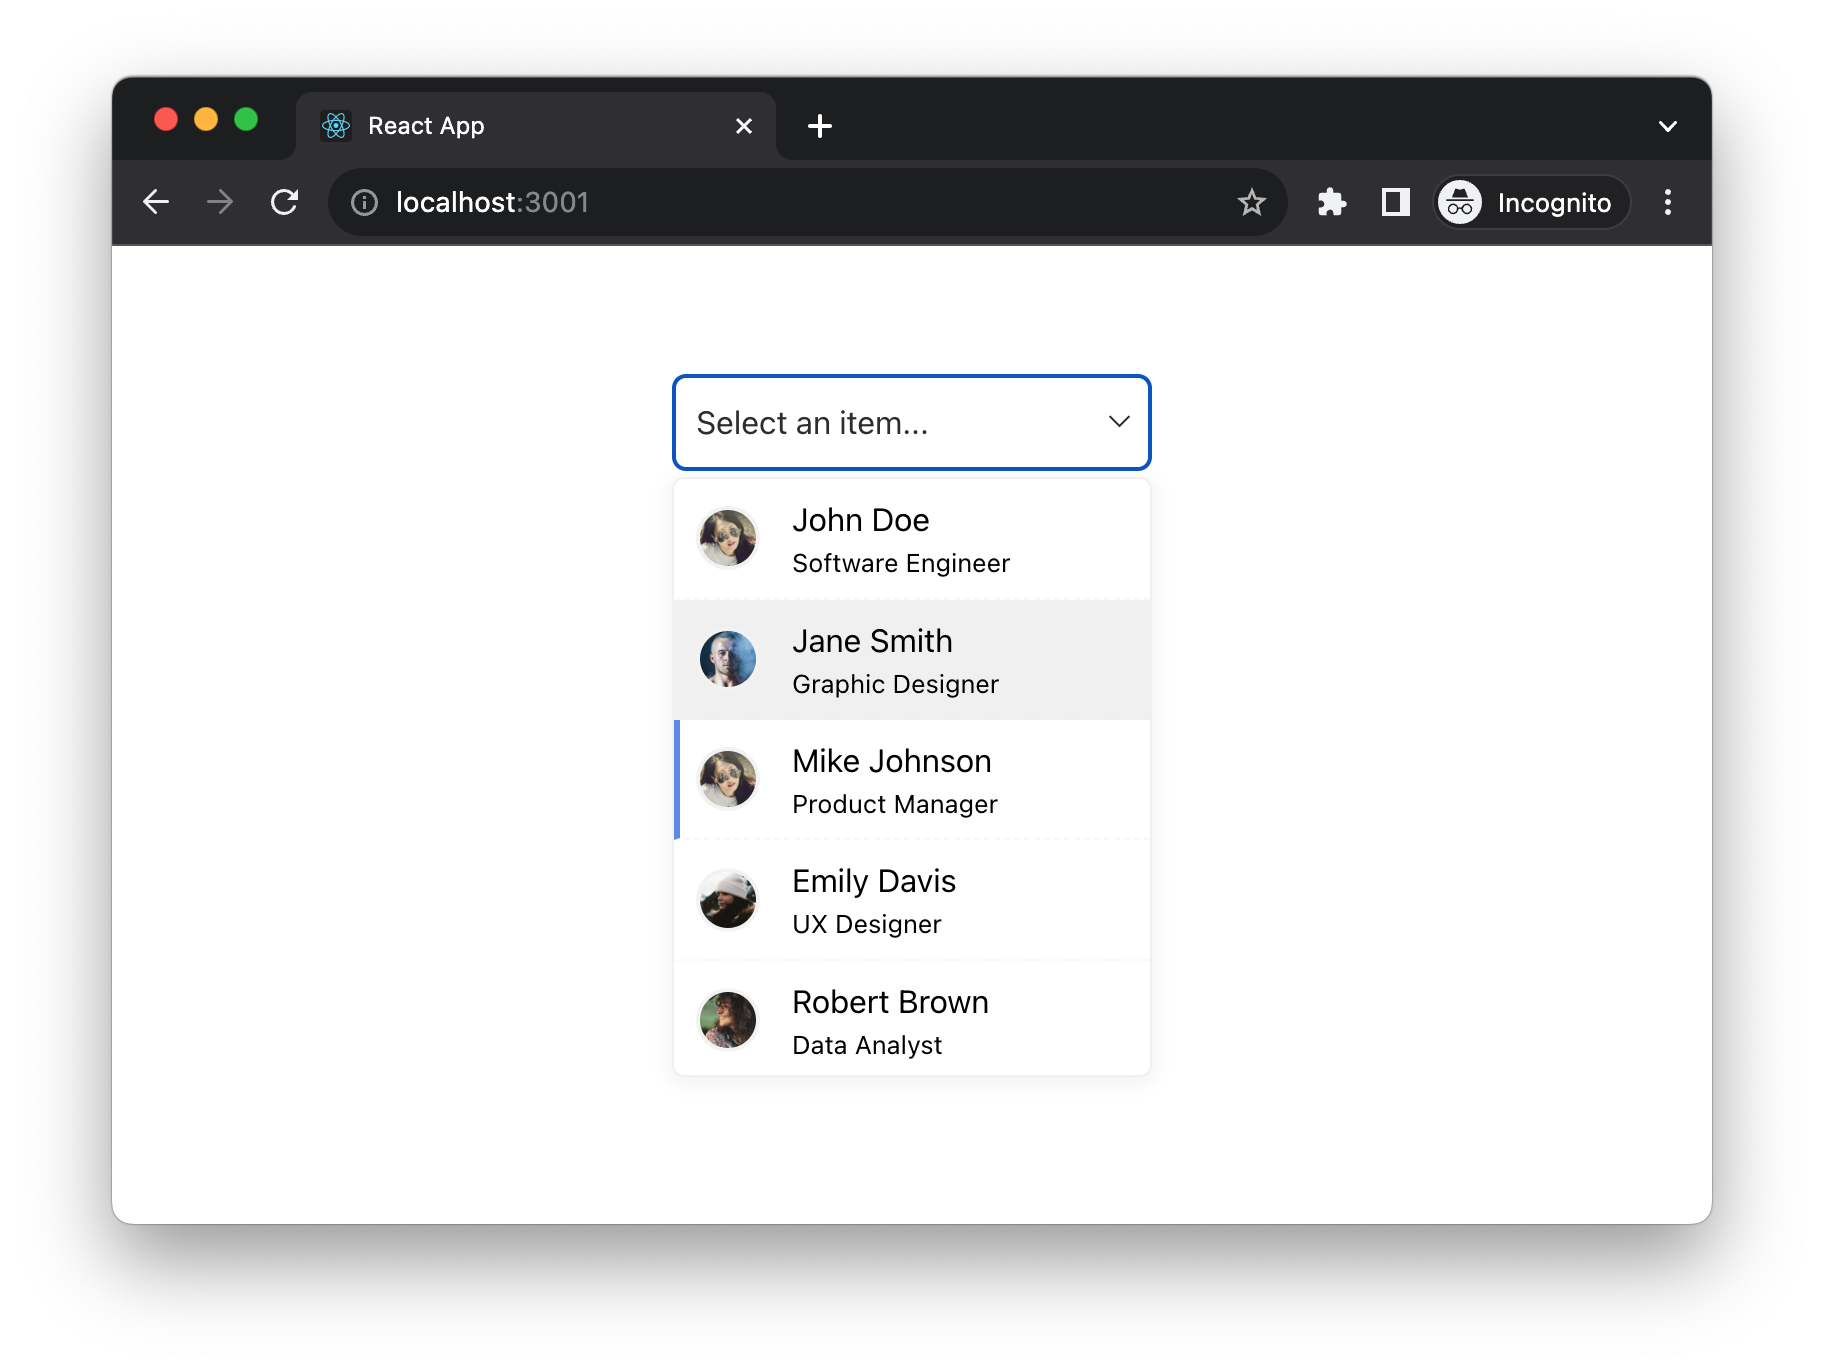
Determine 3: Checklist native implementation
As depicted within the picture above, you may click on the “Choose an merchandise…”
set off to open the dropdown. Choosing a price from the checklist updates
the displayed worth and subsequently closes the dropdown menu.
At this level, our refactored code is clear-cut, with every phase
being easy and adaptable. Modifying or introducing a
completely different Set off part can be comparatively easy.
Nevertheless, as we introduce extra options and handle further states,
will our present elements maintain up?
Let’s discover out with a an important enhancement for a severe dopdown
checklist: keyboard navigation.
Implementing Headless Element with a Customized Hook
To deal with this, we’ll introduce the idea of a Headless Element
through a customized hook named useDropdown. This hook effectively wraps up
the state and keyboard occasion dealing with logic, returning an object stuffed
with important states and capabilities. By de-structuring this in our
Dropdown part, we maintain our code neat and sustainable.
The magic lies within the useDropdown hook, our protagonist—the
Headless Element. This versatile unit homes every thing a dropdown
wants: whether or not it is open, the chosen merchandise, the highlighted merchandise,
reactions to the Enter key, and so forth. The wonder is its
adaptability; you may pair it with numerous visible displays—your JSX
parts.
const useDropdown = (gadgets: Merchandise[]) => {
  // ... state variables ...

  // helper operate can return some aria attribute for UI
  const getAriaAttributes = () => ({
    position: "combobox",
    "aria-expanded": isOpen,
    "aria-activedescendant": selectedItem ? selectedItem.textual content : undefined,
  });

  const handleKeyDown = (e: React.KeyboardEvent) => {
    // ... change assertion ...
  };

  const toggleDropdown = () => setIsOpen((isOpen) => !isOpen);

  return {
    isOpen,
    toggleDropdown,
    handleKeyDown,
    selectedItem,
    setSelectedItem,
    selectedIndex,
  };
};
Now, our Dropdown part is simplified, shorter and simpler to
perceive. It leverages the useDropdown hook to handle its state and
deal with keyboard interactions, demonstrating a transparent separation of
considerations and making the code simpler to grasp and handle.
const Dropdown = ({ gadgets }: DropdownProps) => {
  const {
    isOpen,
    selectedItem,
    selectedIndex,
    toggleDropdown,
    handleKeyDown,
    setSelectedItem,
  } = useDropdown(gadgets);

  return (
    <div className="dropdown" onKeyDown={handleKeyDown}>
      <Set off
        onClick={toggleDropdown}
        label={selectedItem ? selectedItem.textual content : "Choose an merchandise..."}
      />
      {isOpen && (
        <DropdownMenu
          gadgets={gadgets}
          onItemClick={setSelectedItem}
          selectedIndex={selectedIndex}
        />
      )}
    </div>
  );
};
Via these modifications, we now have efficiently applied
keyboard navigation in our dropdown checklist, making it extra accessible and
user-friendly. This instance additionally illustrates how hooks might be utilized
to handle complicated state and logic in a structured and modular method,
paving the best way for additional enhancements and have additions to our UI
elements.
The great thing about this design lies in its distinct separation of logic
from presentation. By ‘logic’, we discuss with the core functionalities of a
choose part: the open/shut state, the chosen merchandise, the
highlighted component, and the reactions to person inputs like urgent the
ArrowDown when selecting from the checklist. This division ensures that our
part retains its core habits with out being sure to a particular
visible illustration, justifying the time period “Headless Element”.
Testing the Headless Element
The logic of our part is centralized, enabling its reuse in
numerous situations. It is essential for this performance to be dependable.
Thus, complete testing turns into crucial. The excellent news is,
testing such habits is simple.
We are able to consider state administration by invoking a public methodology and
observing the corresponding state change. As an example, we will look at
the connection between toggleDropdown and the isOpen state.
const gadgets = [{ text: "Apple" }, { text: "Orange" }, { text: "Banana" }];

it("ought to deal with dropdown open/shut state", () => {
  const { consequence } = renderHook(() => useDropdown(gadgets));

  anticipate(consequence.present.isOpen).toBe(false);

  act(() => {
    consequence.present.toggleDropdown();
  });

  anticipate(consequence.present.isOpen).toBe(true);

  act(() => {
    consequence.present.toggleDropdown();
  });

  anticipate(consequence.present.isOpen).toBe(false);
});
Keyboard navigation exams are barely extra intricate, primarily due
to the absence of a visible interface. This necessitates a extra
built-in testing method. One efficient methodology is crafting a faux
check part to authenticate the habits. Such exams serve a twin
objective: they supply an educational information on using the Headless
Element and, since they make use of JSX, provide a real perception into person
interactions.
Contemplate the next check, which replaces the prior state verify
with an integration check:
it("set off to toggle", async () => {
  render(<SimpleDropdown />);

  const set off = display.getByRole("button");

  anticipate(set off).toBeInTheDocument();

  await userEvent.click on(set off);

  const checklist = display.getByRole("listbox");
  anticipate(checklist).toBeInTheDocument();

  await userEvent.click on(set off);

  anticipate(checklist).not.toBeInTheDocument();
});
The SimpleDropdown beneath is a faux part,
designed solely for testing. It additionally doubles as a
hands-on instance for customers aiming to implement the Headless
Element.
const SimpleDropdown = () => {
  const {
    isOpen,
    toggleDropdown,
    selectedIndex,
    selectedItem,
    updateSelectedItem,
    getAriaAttributes,
    dropdownRef,
  } = useDropdown(gadgets);

  return (
    <div
      tabIndex={0}
      ref={dropdownRef}
      {...getAriaAttributes()}
    >
      <button onClick={toggleDropdown}>Choose</button>
      <p data-testid="selected-item">{selectedItem?.textual content}</p>
      {isOpen && (
        <ul position="listbox">
          {gadgets.map((merchandise, index) => (
            <li
              key={index}
              position="possibility"
              aria-selected={index === selectedIndex}
              onClick={() => updateSelectedItem(merchandise)}
            >
              {merchandise.textual content}
            </li>
          ))}
        </ul>
      )}
    </div>
  );
};
The SimpleDropdown is a dummy part crafted for testing. It
makes use of the centralized logic of useDropdown to create a dropdown checklist.
When the “Choose” button is clicked, the checklist seems or disappears.
This checklist comprises a set of things (Apple, Orange, Banana), and customers can
choose any merchandise by clicking on it. The exams above be certain that this
habits works as meant.
With the SimpleDropdown part in place, we’re geared up to check
a extra intricate but life like situation.
it("choose merchandise utilizing keyboard navigation", async () => {
  render(<SimpleDropdown />);

  const set off = display.getByRole("button");

  anticipate(set off).toBeInTheDocument();

  await userEvent.click on(set off);

  const dropdown = display.getByRole("combobox");
  dropdown.focus();

  await userEvent.kind(dropdown, "{arrowdown}");
  await userEvent.kind(dropdown, "{enter}");

  await anticipate(display.getByTestId("selected-item")).toHaveTextContent(
    gadgets[0].textual content
  );
});
The check ensures that customers can choose gadgets from the dropdown utilizing
keyboard inputs. After rendering the SimpleDropdown and clicking on
its set off button, the dropdown is concentrated. Subsequently, the check
simulates a keyboard arrow-down press to navigate to the primary merchandise and
an enter press to pick it. The check then verifies if the chosen merchandise
shows the anticipated textual content.
Whereas using customized hooks for Headless Parts is widespread, it isn’t the only method.
The truth is, earlier than the arrival of hooks, builders employed render props or Greater-Order
Parts to implement Headless Parts. These days, regardless that Greater-Order
Parts have misplaced a few of their earlier reputation, a declarative API using
React context continues to be pretty favoured.
Declarative Headless Element with context API
I am going to showcase an alternate declarative methodology to realize an identical consequence,
using the React context API on this occasion. By establishing a hierarchy
throughout the part tree and making every part replaceable, we will provide
customers a helpful interface that not solely capabilities successfully (supporting
keyboard navigation, accessibility, and so forth.), but in addition offers the pliability
to customise their very own elements.
import { HeadlessDropdown as Dropdown } from "./HeadlessDropdown";

const HeadlessDropdownUsage = ({ gadgets }: { gadgets: Merchandise[] }) => {
  return (
    <Dropdown gadgets={gadgets}>
      <Dropdown.Set off as={Set off}>Choose an possibility</Dropdown.Set off>
      <Dropdown.Checklist as={CustomList}>
        {gadgets.map((merchandise, index) => (
          <Dropdown.Choice
            index={index}
            key={index}
            merchandise={merchandise}
            as={CustomListItem}
          />
        ))}
      </Dropdown.Checklist>
    </Dropdown>
  );
};
The HeadlessDropdownUsage part takes an gadgets
prop of kind array of Merchandise and returns a Dropdown
part. Inside Dropdown, it defines a Dropdown.Set off
to render a CustomTrigger part, a Dropdown.Checklist
to render a CustomList part, and maps by means of the
gadgets array to create a Dropdown.Choice for every
merchandise, rendering a CustomListItem part.
This construction allows a versatile, declarative approach of customizing the
rendering and habits of the dropdown menu whereas retaining a transparent hierarchical
relationship between the elements. Please observe that the elements
Dropdown.Set off, Dropdown.Checklist, and
Dropdown.Choice provide unstyled default HTML parts (button, ul,
and li respectively). They every settle for an as prop, enabling customers
to customise elements with their very own types and behaviors.
For instance, we will outline these customised part and use it as above.
const CustomTrigger = ({ onClick, ...props }) => (
  <button className="set off" onClick={onClick} {...props} />
);

const CustomList = ({ ...props }) => (
  <div {...props} className="dropdown-menu" />
);

const CustomListItem = ({ ...props }) => (
  <div {...props} className="item-container" />
);
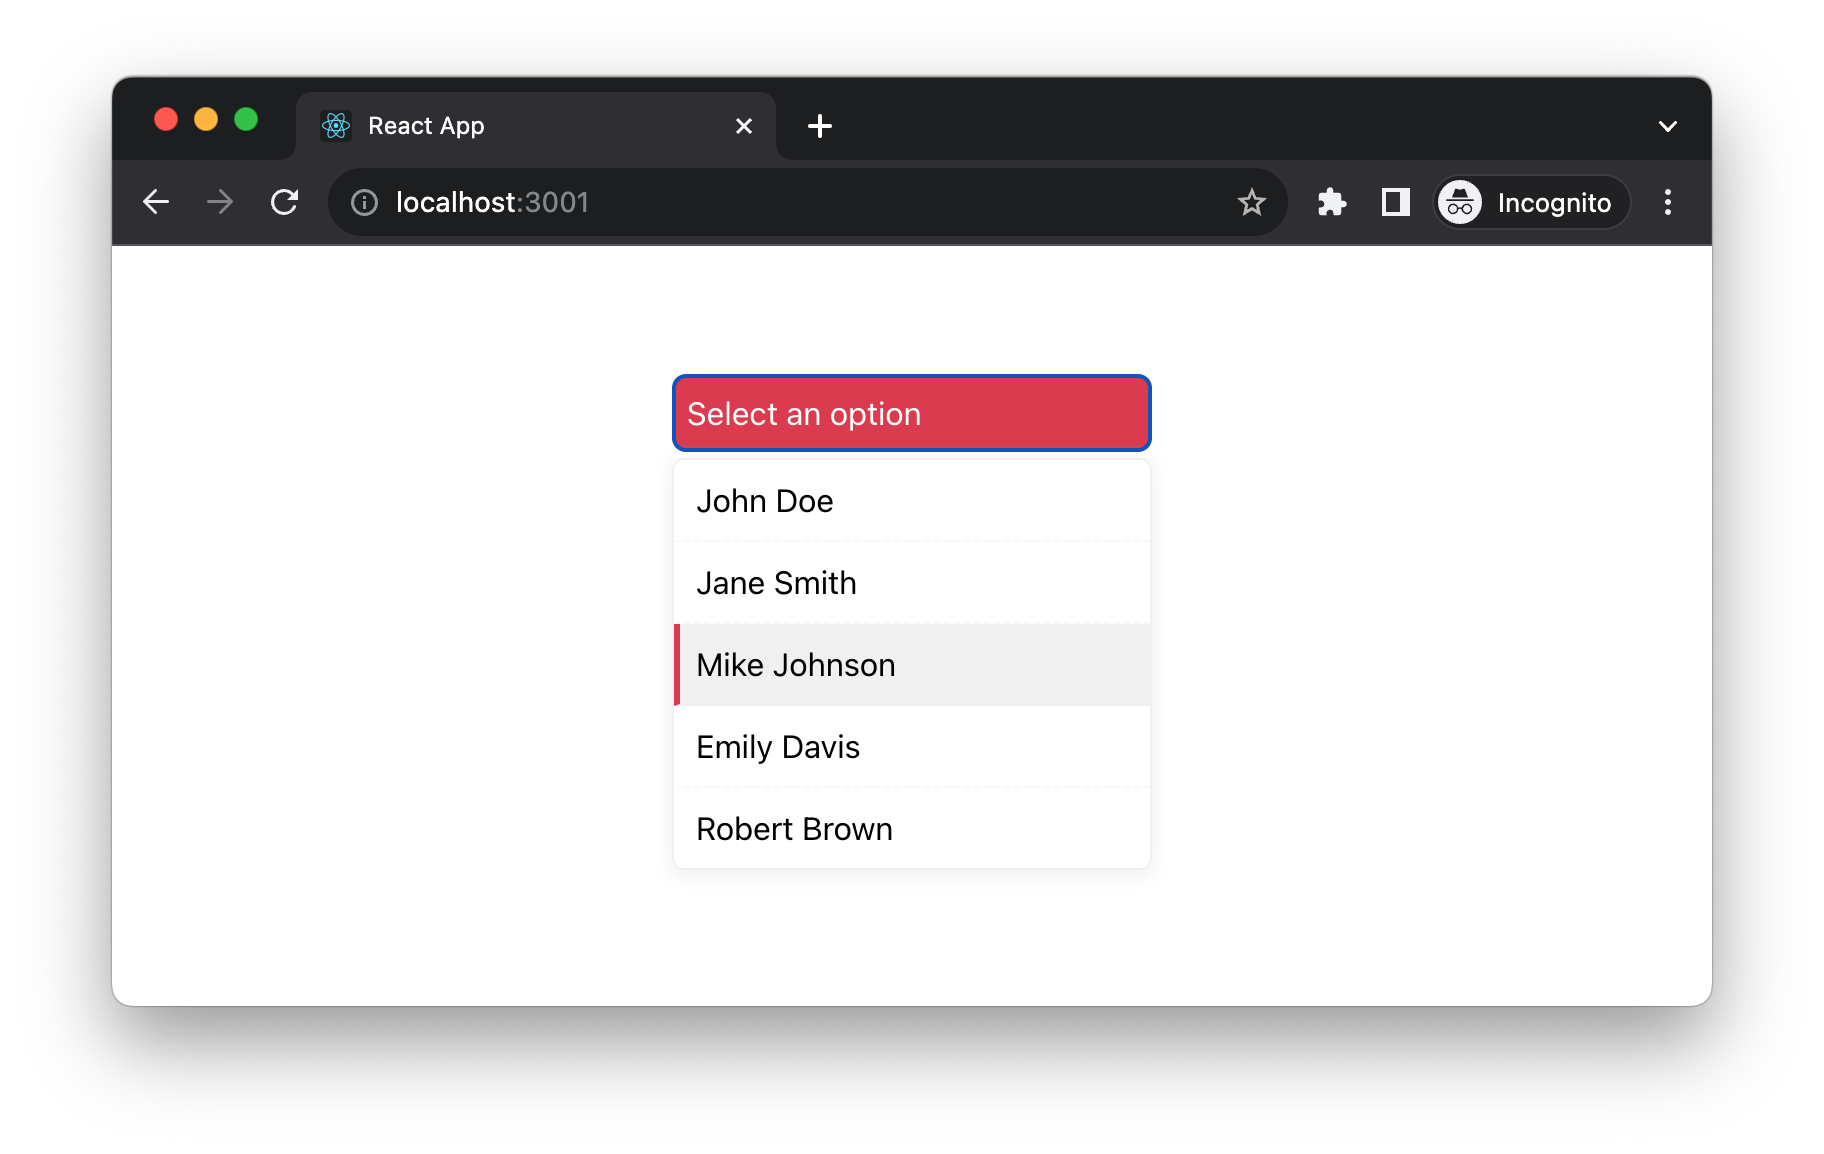
Determine 4: Declarative Consumer Interface with customised
parts
The implementation is not sophisticated. We are able to merely outline a context in
Dropdown (the foundation component) and put all of the states must be
managed inside, and use that context within the kids nodes to allow them to entry
the states (or change these states through APIs within the context).
kind DropdownContextType<T> =  null;
  updateSelectedItem: (merchandise: T) => void;
  getAriaAttributes: () => any;
  dropdownRef: RefObject<HTMLElement>;
;

operate createDropdownContext<T>()  null>(null);


const DropdownContext = createDropdownContext();

export const useDropdownContext = () => {
  const context = useContext(DropdownContext);
  if (!context) {
    throw new Error("Parts should be used inside a <Dropdown/>");
  }
  return context;
};
The code defines a generic DropdownContextType kind, and a
createDropdownContext operate to create a context with this sort.
DropdownContext is created utilizing this operate.
useDropdownContext is a customized hook that accesses this context,
throwing an error if it is used exterior of a <Dropdown/>
part, guaranteeing correct utilization throughout the desired part hierarchy.
Then we will outline elements that use the context. We are able to begin with the
context supplier:
const HeadlessDropdown = <T extends { textual content: string }>({
  kids,
  gadgets,
}: {
  kids: React.ReactNode;
  gadgets: T[];
}) => {
  const {
    //... all of the states and state setters from the hook
  } = useDropdown(gadgets);

  return (
    <DropdownContext.Supplier
      worth={{
        isOpen,
        toggleDropdown,
        selectedIndex,
        selectedItem,
        updateSelectedItem,
      }}
    >
      <div
        ref={dropdownRef as RefObject<HTMLDivElement>}
        {...getAriaAttributes()}
      >
        {kids}
      </div>
    </DropdownContext.Supplier>
  );
};
The HeadlessDropdown part takes two props:
kids and gadgets, and makes use of a customized hook
useDropdown to handle its state and habits. It offers a context
through DropdownContext.Supplier to share state and habits with its
descendants. Inside a div, it units a ref and applies ARIA
attributes for accessibility, then renders its kids to show
the nested elements, enabling a structured and customizable dropdown
performance.
Notice how we use useDropdown hook we outlined within the earlier
part, after which cross these values all the way down to the youngsters of
HeadlessDropdown. Following this, we will outline the kid
elements:
HeadlessDropdown.Set off = operate Set off({
  as: Element = "button",
  ...props
}) {
  const { toggleDropdown } = useDropdownContext();

  return <Element tabIndex={0} onClick={toggleDropdown} {...props} />;
};

HeadlessDropdown.Checklist = operate Checklist({
  as: Element = "ul",
  ...props
}) {
  const { isOpen } = useDropdownContext();

  return isOpen ? <Element {...props} position="listbox" tabIndex={0} /> : null;
};

HeadlessDropdown.Choice = operate Choice({
  as: Element = "li",
  index,
  merchandise,
  ...props
}) {
  const { updateSelectedItem, selectedIndex } = useDropdownContext();

  return (
    <Element
      position="possibility"
      aria-selected={index === selectedIndex}
      key={index}
      onClick={() => updateSelectedItem(merchandise)}
      {...props}
    >
      {merchandise.textual content}
    </Element>
  );
};
We outlined a kind GenericComponentType to deal with a part or an
HTML tag together with any further properties. Three capabilities
HeadlessDropdown.Set off, HeadlessDropdown.Checklist, and
HeadlessDropdown.Choice are outlined to render respective components of
a dropdown menu. Every operate makes use of the as prop to permit customized
rendering of a part, and spreads further properties onto the rendered
part. All of them entry shared state and habits through
useDropdownContext.
HeadlessDropdown.Set offrenders a button by default that
toggles the dropdown menu.HeadlessDropdown.Checklistrenders an inventory container if the
dropdown is open.HeadlessDropdown.Choicerenders particular person checklist gadgets and
updates the chosen merchandise when clicked.
These capabilities collectively enable a customizable and accessible dropdown menu
construction.
It largely boils all the way down to person choice on how they select to make the most of the
Headless Element of their codebase. Personally, I lean in direction of hooks as they
do not contain any DOM (or digital DOM) interactions; the only bridge between
the shared state logic and UI is the ref object. However, with the
context-based implementation, a default implementation can be supplied when the
person decides to not customise it.
Within the upcoming instance, I am going to display how effortlessly we will
transition to a special UI whereas retaining the core performance with the useDropdown hook.