React has revolutionized the way in which we take into consideration UI elements and state
administration in UI. However with each new characteristic request or enhancement, a
seemingly easy element can shortly evolve into a posh amalgamation
of intertwined state and UI logic.
Think about constructing a easy dropdown listing. Initially, it seems
easy – you handle the open/shut state and design its
look. However, as your utility grows and evolves, so do the
necessities for this dropdown:
- Accessibility Assist: Making certain your dropdown is usable for
everybody, together with these utilizing display screen readers or different assistive
applied sciences, provides one other layer of complexity. You have to handle focus
states,ariaattributes, and guarantee your dropdown is semantically
right. - Keyboard Navigation: Customers shouldn’t be restricted to mouse
interactions. They may need to navigate choices utilizing arrow keys, choose
utilizingEnter, or shut the dropdown utilizingEscape. This requires
extra occasion listeners and state administration. - Async Information Concerns: As your utility scales, possibly the
dropdown choices aren’t hardcoded anymore. They is likely to be fetched from an
API. This introduces the necessity to handle loading, error, and empty states
inside the dropdown. - UI Variations and Theming: Completely different elements of your utility
would possibly require totally different kinds or themes for the dropdown. Managing these
variations inside the element can result in an explosion of props and
configurations. - Extending Options: Over time, you would possibly want extra
options like multi-select, filtering choices, or integration with different
type controls. Including these to an already complicated element could be
daunting.
Every of those concerns provides layers of complexity to our dropdown
element. Mixing state, logic, and UI presentation makes it much less
maintainable and limits its reusability. The extra intertwined they develop into,
the more durable it will get to make modifications with out unintentional negative effects.
Introducing the Headless Part Sample
Going through these challenges head-on, the Headless Part sample presents
a means out. It emphasizes the separation of the calculation from the UI
illustration, giving builders the ability to construct versatile,
maintainable, and reusable elements.
A Headless Part is a design sample in React the place a element –
usually inplemented as React hooks – is accountable solely for logic and
state administration with out prescribing any particular UI (Consumer Interface). It
supplies the “brains” of the operation however leaves the “seems to be” to the
developer implementing it. In essence, it presents performance with out
forcing a selected visible illustration.
When visualized, the Headless Part seems as a slender layer
interfacing with JSX views on one facet, and speaking with underlying
information fashions on the opposite when required. This sample is especially
useful for people in search of solely the conduct or state administration
side of the UI, because it conveniently segregates these from the visible
illustration.

Determine 1: The Headless Part sample
For example, contemplate a headless dropdown element. It might deal with
state administration for open/shut states, merchandise choice, keyboard
navigation, and so forth. When it is time to render, as a substitute of rendering its personal
hardcoded dropdown UI, it supplies this state and logic to a toddler
perform or element, letting the developer resolve the way it ought to visually
seem.
On this article, we’ll delve right into a sensible instance by setting up a
complicated element—a dropdown listing from the bottom up. As we add extra
options to the element, we’ll observe the challenges that come up.
Via this, we’ll exhibit how the Headless Part sample can
handle these challenges, compartmentalize distinct considerations, and support us
in crafting extra versatile elements.
Implementing a Dropdown Listing
A dropdown listing is a standard element utilized in many locations. Though
there is a native choose element for primary use circumstances, a extra superior
model providing extra management over every possibility supplies a greater consumer
expertise.
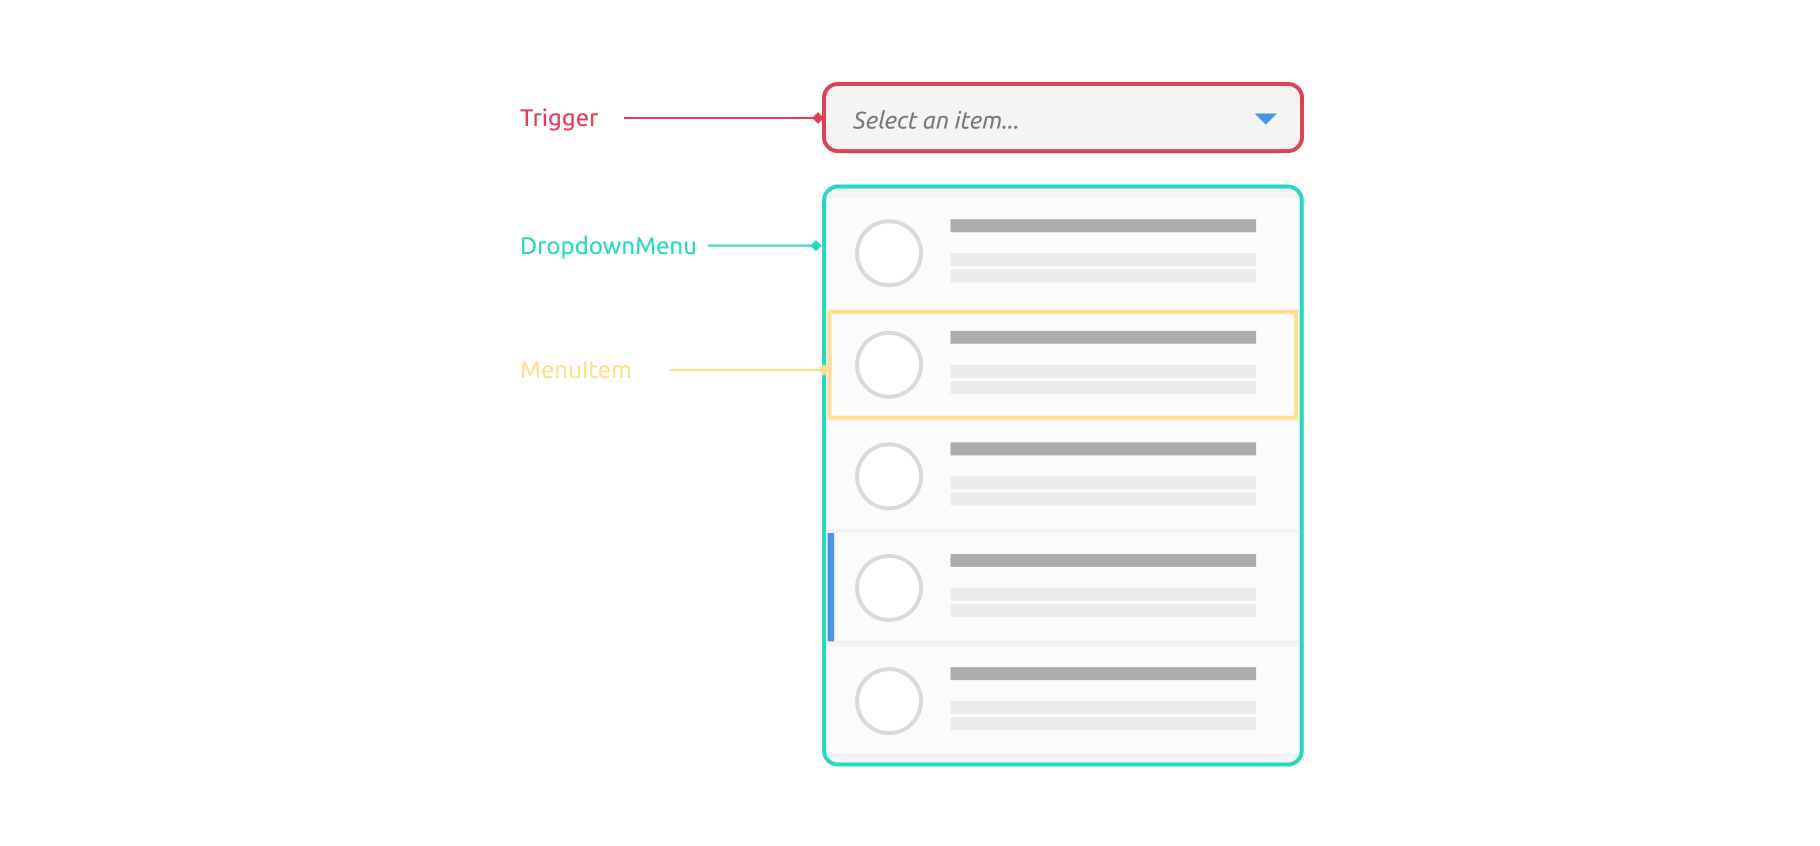
Determine 2: Dropdown listing element
Creating one from scratch, an entire implementation, requires extra
effort than it seems at first look. It is important to contemplate
keyboard navigation, accessibility (as an illustration, display screen reader
compatibility), and value on cell gadgets, amongst others.
We’ll start with a easy, desktop model that solely helps mouse
clicks, and step by step construct in additional options to make it real looking. Word
that the purpose right here is to disclose a couple of software program design patterns quite
than train learn how to construct a dropdown listing for manufacturing use – truly, I
don’t suggest doing this from scratch and would as a substitute recommend utilizing
extra mature libraries.
Mainly, we’d like a component (let’s name it a set off) for the consumer
to click on, and a state to manage the present and conceal actions of an inventory
panel. Initially, we conceal the panel, and when the set off is clicked, we
present the listing panel.
import { useState } from "react";

interface Merchandise {
  icon: string;
  textual content: string;
  description: string;
}

kind DropdownProps = {
  objects: Merchandise[];
};

const Dropdown = ({ objects }: DropdownProps) => {
  const [isOpen, setIsOpen] = useState(false);
  const [selectedItem, setSelectedItem] = useState<Merchandise | null>(null);

  return (
    <div className="dropdown">
      <div className="set off" tabIndex={0} onClick={() => setIsOpen(!isOpen)}>
        <span className="choice">
          {selectedItem ? selectedItem.textual content : "Choose an merchandise..."}
        </span>
      </div>
      {isOpen && (
        <div className="dropdown-menu">
          {objects.map((merchandise, index) => (
            <div
              key={index}
              onClick={() => setSelectedItem(merchandise)}
              className="item-container"
            >
              <img src={merchandise.icon} alt={merchandise.textual content} />
              <div className="particulars">
                <div>{merchandise.textual content}</div>
                <small>{merchandise.description}</small>
              </div>
            </div>
          ))}
        </div>
      )}
    </div>
  );
};
Within the code above, we have arrange the fundamental construction for our dropdown
element. Utilizing the useState hook, we handle the isOpen and
selectedItem states to manage the dropdown’s conduct. A easy click on
on the set off toggles the dropdown menu, whereas choosing an merchandise
updates the selectedItem state.
Let’s break down the element into smaller, manageable items to see
it extra clearly. This decomposition is not a part of the Headless Part
sample, however breaking a posh UI element into items is a helpful
exercise.
We are able to begin by extracting a Set off element to deal with consumer
clicks:
const Set off = ({
  label,
  onClick,
}: {
  label: string;
  onClick: () => void;
}) => {
  return (
    <div className="set off" tabIndex={0} onClick={onClick}>
      <span className="choice">{label}</span>
    </div>
  );
};
The Set off element is a primary clickable UI component, taking in a
label to show and an onClick handler. It stays agnostic to its
surrounding context. Equally, we will extract a DropdownMenu
element to render the listing of things:
const DropdownMenu = ({
  objects,
  onItemClick,
}: {
  objects: Merchandise[];
  onItemClick: (merchandise: Merchandise) => void;
}) => {
  return (
    <div className="dropdown-menu">
      {objects.map((merchandise, index) => (
        <div
          key={index}
          onClick={() => onItemClick(merchandise)}
          className="item-container"
        >
          <img src={merchandise.icon} alt={merchandise.textual content} />
          <div className="particulars">
            <div>{merchandise.textual content}</div>
            <small>{merchandise.description}</small>
          </div>
        </div>
      ))}
    </div>
  );
};
The DropdownMenu element shows an inventory of things, every with an
icon and an outline. When an merchandise is clicked, it triggers the
offered onItemClick perform with the chosen merchandise as its
argument.
After which Throughout the Dropdown element, we incorporate Set off
and DropdownMenu and provide them with the required state. This
method ensures that the Set off and DropdownMenu elements stay
state-agnostic and purely react to handed props.
const Dropdown = ({ objects }: DropdownProps) => {
  const [isOpen, setIsOpen] = useState(false);
  const [selectedItem, setSelectedItem] = useState<Merchandise | null>(null);

  return (
    <div className="dropdown">
      <Set off
        label={selectedItem ? selectedItem.textual content : "Choose an merchandise..."}
        onClick={() => setIsOpen(!isOpen)}
      />
      {isOpen && <DropdownMenu objects={objects} onItemClick={setSelectedItem} />}
    </div>
  );
};
On this up to date code construction, we have separated considerations by creating
specialised elements for various elements of the dropdown, making the
code extra organized and simpler to handle.
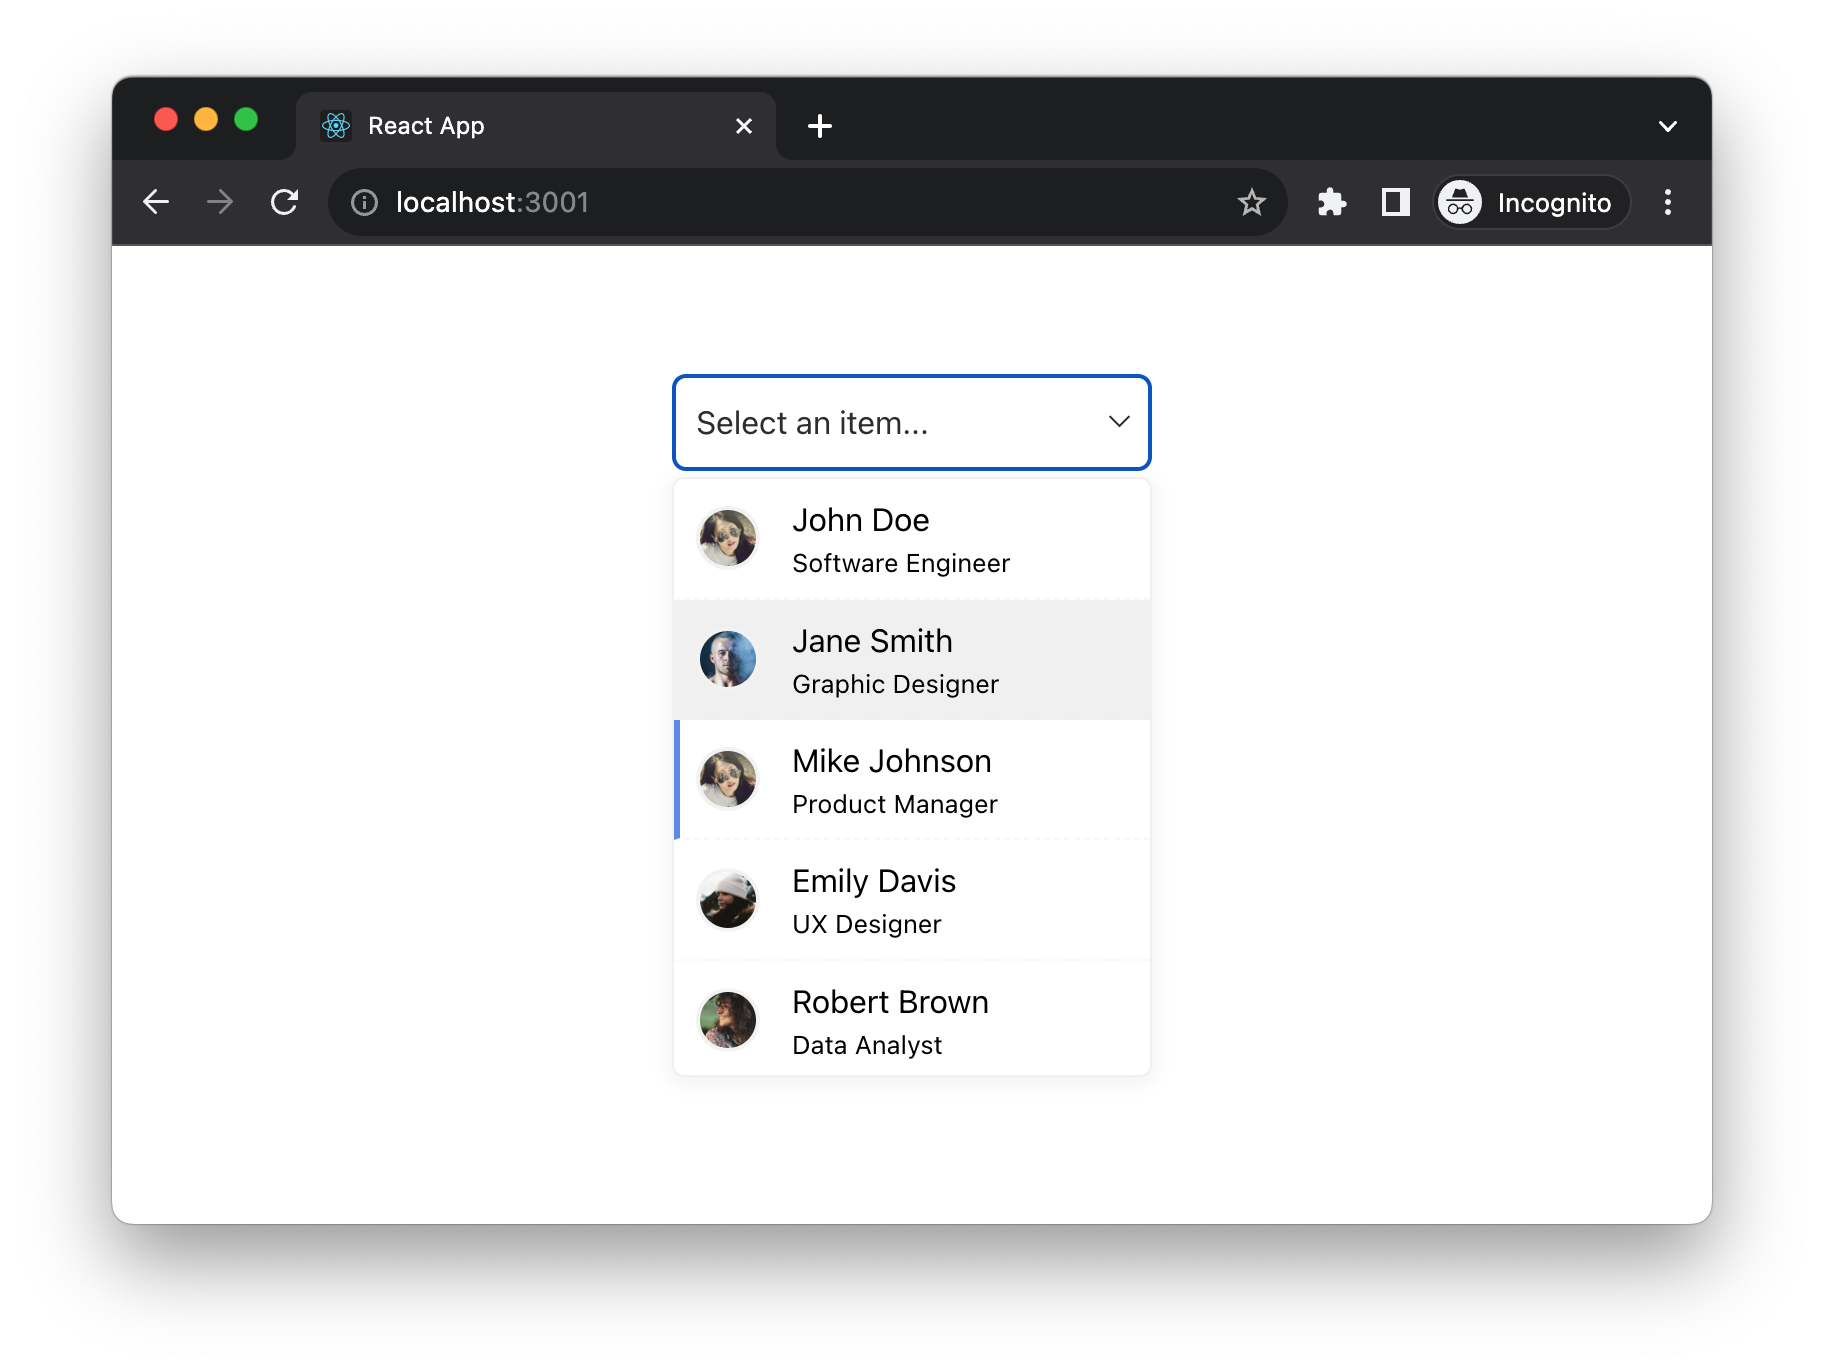
Determine 3: Listing native implementation
As depicted within the picture above, you possibly can click on the “Choose an merchandise…”
set off to open the dropdown. Choosing a price from the listing updates
the displayed worth and subsequently closes the dropdown menu.
At this level, our refactored code is clear-cut, with every section
being easy and adaptable. Modifying or introducing a
totally different Set off element can be comparatively easy.
Nonetheless, as we introduce extra options and handle extra states,
will our present elements maintain up?
Let’s discover out with a a vital enhancement for a critical dopdown
listing: keyboard navigation.
Implementing Headless Part with a Customized Hook
To deal with this, we’ll introduce the idea of a Headless Part
by way of a customized hook named useDropdown. This hook effectively wraps up
the state and keyboard occasion dealing with logic, returning an object crammed
with important states and capabilities. By de-structuring this in our
Dropdown element, we preserve our code neat and sustainable.
The magic lies within the useDropdown hook, our protagonist—the
Headless Part. This versatile unit homes all the pieces a dropdown
wants: whether or not it is open, the chosen merchandise, the highlighted merchandise,
reactions to the Enter key, and so forth. The sweetness is its
adaptability; you possibly can pair it with numerous visible displays—your JSX
components.
const useDropdown = (objects: Merchandise[]) => {
  // ... state variables ...

  // helper perform can return some aria attribute for UI
  const getAriaAttributes = () => ({
    position: "combobox",
    "aria-expanded": isOpen,
    "aria-activedescendant": selectedItem ? selectedItem.textual content : undefined,
  });

  const handleKeyDown = (e: React.KeyboardEvent) => {
    // ... swap assertion ...
  };

  const toggleDropdown = () => setIsOpen((isOpen) => !isOpen);

  return {
    isOpen,
    toggleDropdown,
    handleKeyDown,
    selectedItem,
    setSelectedItem,
    selectedIndex,
  };
};
Now, our Dropdown element is simplified, shorter and simpler to
perceive. It leverages the useDropdown hook to handle its state and
deal with keyboard interactions, demonstrating a transparent separation of
considerations and making the code simpler to grasp and handle.
const Dropdown = ({ objects }: DropdownProps) => {
  const {
    isOpen,
    selectedItem,
    selectedIndex,
    toggleDropdown,
    handleKeyDown,
    setSelectedItem,
  } = useDropdown(objects);

  return (
    <div className="dropdown" onKeyDown={handleKeyDown}>
      <Set off
        onClick={toggleDropdown}
        label={selectedItem ? selectedItem.textual content : "Choose an merchandise..."}
      />
      {isOpen && (
        <DropdownMenu
          objects={objects}
          onItemClick={setSelectedItem}
          selectedIndex={selectedIndex}
        />
      )}
    </div>
  );
};
Via these modifications, we now have efficiently applied
keyboard navigation in our dropdown listing, making it extra accessible and
user-friendly. This instance additionally illustrates how hooks could be utilized
to handle complicated state and logic in a structured and modular method,
paving the way in which for additional enhancements and have additions to our UI
elements.
The fantastic thing about this design lies in its distinct separation of logic
from presentation. By ‘logic’, we check with the core functionalities of a
choose element: the open/shut state, the chosen merchandise, the
highlighted component, and the reactions to consumer inputs like urgent the
ArrowDown when selecting from the listing. This division ensures that our
element retains its core conduct with out being sure to a particular
visible illustration, justifying the time period “Headless Part”.
Testing the Headless Part
The logic of our element is centralized, enabling its reuse in
various situations. It is essential for this performance to be dependable.
Thus, complete testing turns into crucial. The excellent news is,
testing such conduct is easy.
We are able to consider state administration by invoking a public methodology and
observing the corresponding state change. For example, we will look at
the connection between toggleDropdown and the isOpen state.
const objects = [{ text: "Apple" }, { text: "Orange" }, { text: "Banana" }];

it("ought to deal with dropdown open/shut state", () => {
  const { end result } = renderHook(() => useDropdown(objects));

  anticipate(end result.present.isOpen).toBe(false);

  act(() => {
    end result.present.toggleDropdown();
  });

  anticipate(end result.present.isOpen).toBe(true);

  act(() => {
    end result.present.toggleDropdown();
  });

  anticipate(end result.present.isOpen).toBe(false);
});
Keyboard navigation exams are barely extra intricate, primarily due
to the absence of a visible interface. This necessitates a extra
built-in testing method. One efficient methodology is crafting a pretend
take a look at element to authenticate the conduct. Such exams serve a twin
objective: they supply an educational information on using the Headless
Part and, since they make use of JSX, provide a real perception into consumer
interactions.
Contemplate the next take a look at, which replaces the prior state verify
with an integration take a look at:
it("set off to toggle", async () => {
  render(<SimpleDropdown />);

  const set off = display screen.getByRole("button");

  anticipate(set off).toBeInTheDocument();

  await userEvent.click on(set off);

  const listing = display screen.getByRole("listbox");
  anticipate(listing).toBeInTheDocument();

  await userEvent.click on(set off);

  anticipate(listing).not.toBeInTheDocument();
});
The SimpleDropdown beneath is a pretend element,
designed completely for testing. It additionally doubles as a
hands-on instance for customers aiming to implement the Headless
Part.
const SimpleDropdown = () => {
  const {
    isOpen,
    toggleDropdown,
    selectedIndex,
    selectedItem,
    updateSelectedItem,
    getAriaAttributes,
    dropdownRef,
  } = useDropdown(objects);

  return (
    <div
      tabIndex={0}
      ref={dropdownRef}
      {...getAriaAttributes()}
    >
      <button onClick={toggleDropdown}>Choose</button>
      <p data-testid="selected-item">{selectedItem?.textual content}</p>
      {isOpen && (
        <ul position="listbox">
          {objects.map((merchandise, index) => (
            <li
              key={index}
              position="possibility"
              aria-selected={index === selectedIndex}
              onClick={() => updateSelectedItem(merchandise)}
            >
              {merchandise.textual content}
            </li>
          ))}
        </ul>
      )}
    </div>
  );
};
The SimpleDropdown is a dummy element crafted for testing. It
makes use of the centralized logic of useDropdown to create a dropdown listing.
When the “Choose” button is clicked, the listing seems or disappears.
This listing incorporates a set of things (Apple, Orange, Banana), and customers can
choose any merchandise by clicking on it. The exams above make sure that this
conduct works as supposed.
With the SimpleDropdown element in place, we’re geared up to check
a extra intricate but real looking state of affairs.
it("choose merchandise utilizing keyboard navigation", async () => {
  render(<SimpleDropdown />);

  const set off = display screen.getByRole("button");

  anticipate(set off).toBeInTheDocument();

  await userEvent.click on(set off);

  const dropdown = display screen.getByRole("combobox");
  dropdown.focus();

  await userEvent.kind(dropdown, "{arrowdown}");
  await userEvent.kind(dropdown, "{enter}");

  await anticipate(display screen.getByTestId("selected-item")).toHaveTextContent(
    objects[0].textual content
  );
});
The take a look at ensures that customers can choose objects from the dropdown utilizing
keyboard inputs. After rendering the SimpleDropdown and clicking on
its set off button, the dropdown is targeted. Subsequently, the take a look at
simulates a keyboard arrow-down press to navigate to the primary merchandise and
an enter press to pick out it. The take a look at then verifies if the chosen merchandise
shows the anticipated textual content.
Whereas using customized hooks for Headless Parts is frequent, it isn’t the only real method.
The truth is, earlier than the appearance of hooks, builders employed render props or Greater-Order
Parts to implement Headless Parts. These days, regardless that Greater-Order
Parts have misplaced a few of their earlier reputation, a declarative API using
React context continues to be pretty favoured.
Declarative Headless Part with context API
I will showcase an alternate declarative methodology to achieve an analogous final result,
using the React context API on this occasion. By establishing a hierarchy
inside the element tree and making every element replaceable, we will provide
customers a helpful interface that not solely capabilities successfully (supporting
keyboard navigation, accessibility, and so forth.), but additionally supplies the flexibleness
to customise their very own elements.
import { HeadlessDropdown as Dropdown } from "./HeadlessDropdown";

const HeadlessDropdownUsage = ({ objects }: { objects: Merchandise[] }) => {
  return (
    <Dropdown objects={objects}>
      <Dropdown.Set off as={Set off}>Choose an possibility</Dropdown.Set off>
      <Dropdown.Listing as={CustomList}>
        {objects.map((merchandise, index) => (
          <Dropdown.Possibility
            index={index}
            key={index}
            merchandise={merchandise}
            as={CustomListItem}
          />
        ))}
      </Dropdown.Listing>
    </Dropdown>
  );
};
The HeadlessDropdownUsage element takes an objects
prop of kind array of Merchandise and returns a Dropdown
element. Inside Dropdown, it defines a Dropdown.Set off
to render a CustomTrigger element, a Dropdown.Listing
to render a CustomList element, and maps by way of the
objects array to create a Dropdown.Possibility for every
merchandise, rendering a CustomListItem element.
This construction allows a versatile, declarative means of customizing the
rendering and conduct of the dropdown menu whereas conserving a transparent hierarchical
relationship between the elements. Please observe that the elements
Dropdown.Set off, Dropdown.Listing, and
Dropdown.Possibility provide unstyled default HTML components (button, ul,
and li respectively). They every settle for an as prop, enabling customers
to customise elements with their very own kinds and behaviors.
For instance, we will outline these customised element and use it as above.
const CustomTrigger = ({ onClick, ...props }) => (
  <button className="set off" onClick={onClick} {...props} />
);

const CustomList = ({ ...props }) => (
  <div {...props} className="dropdown-menu" />
);

const CustomListItem = ({ ...props }) => (
  <div {...props} className="item-container" />
);
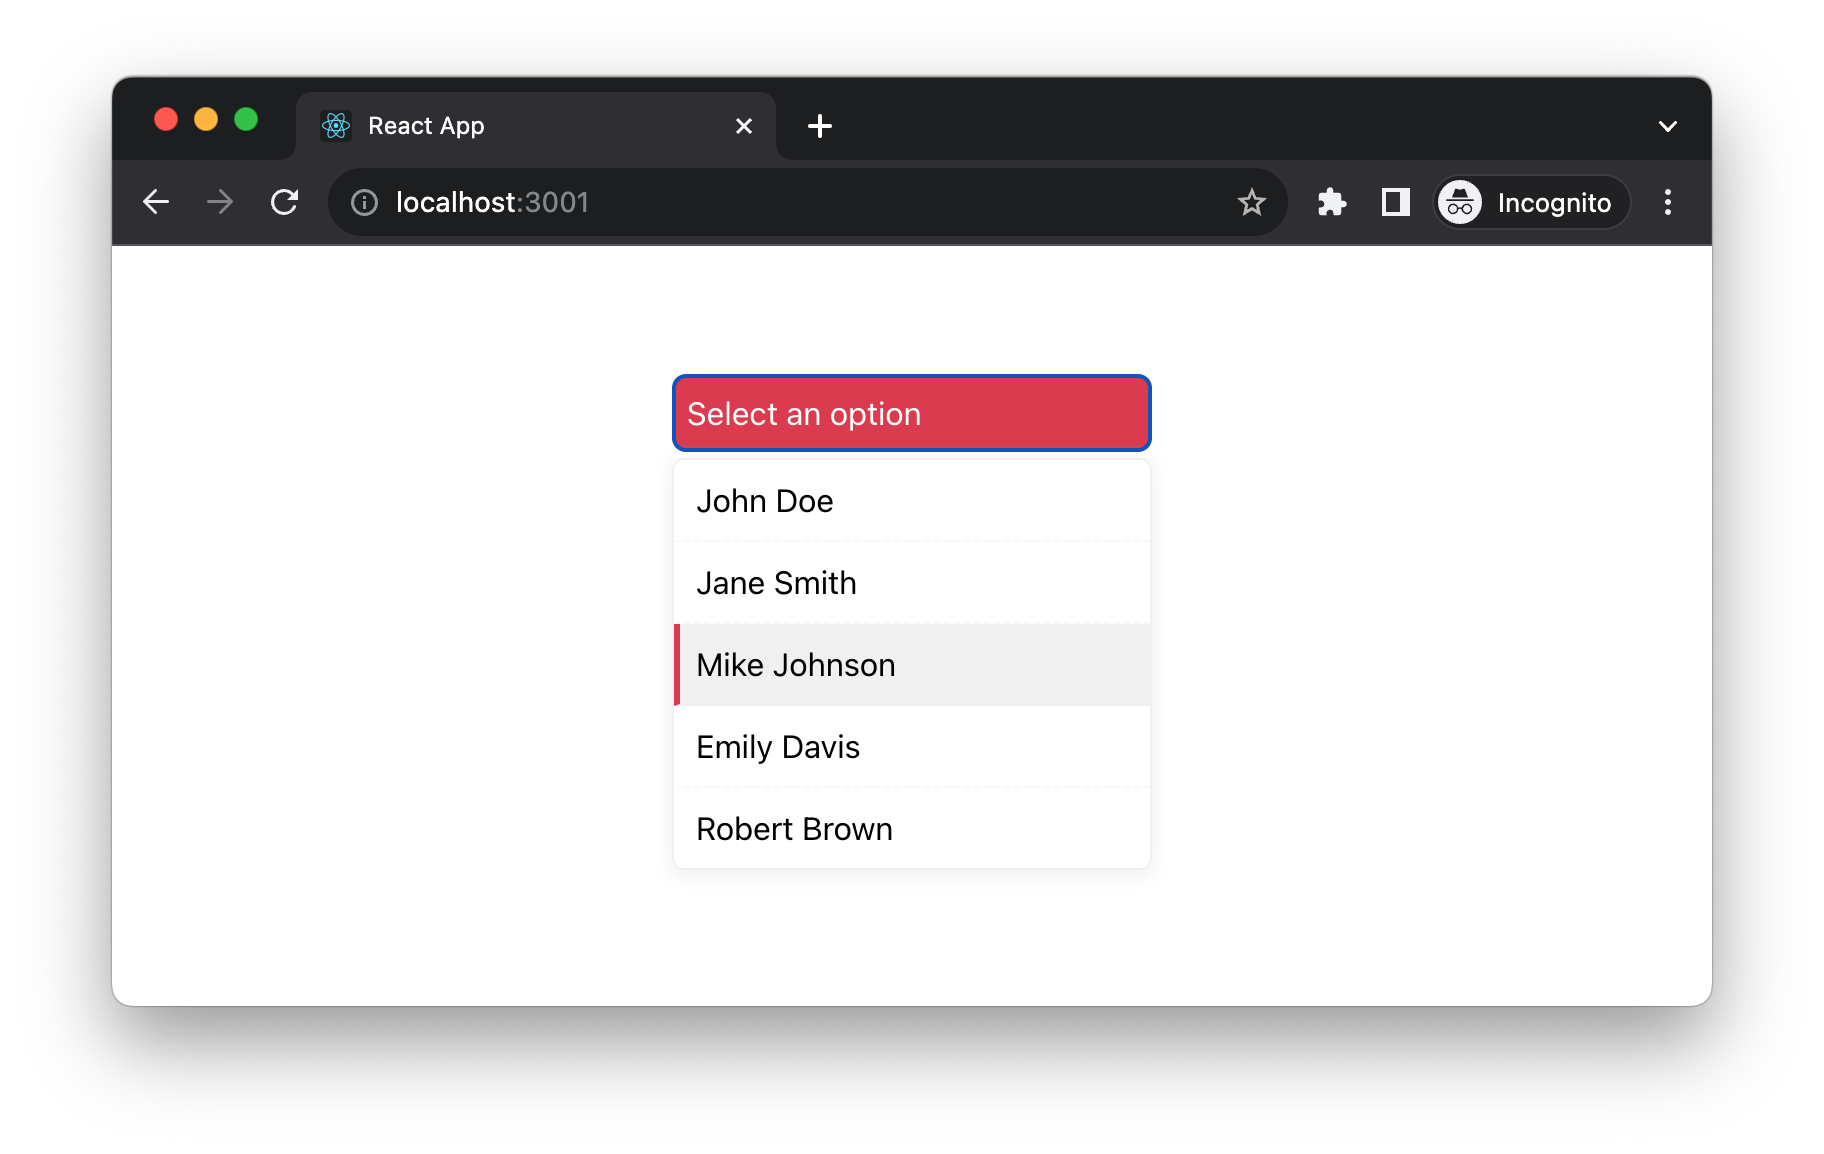
Determine 4: Declarative Consumer Interface with customised
components
The implementation is not sophisticated. We are able to merely outline a context in
Dropdown (the basis component) and put all of the states have to be
managed inside, and use that context within the kids nodes to allow them to entry
the states (or change these states by way of APIs within the context).
kind DropdownContextType<T> =  null;
  updateSelectedItem: (merchandise: T) => void;
  getAriaAttributes: () => any;
  dropdownRef: RefObject<HTMLElement>;
;

perform createDropdownContext<T>()  null>(null);


const DropdownContext = createDropdownContext();

export const useDropdownContext = () => {
  const context = useContext(DropdownContext);
  if (!context) {
    throw new Error("Parts have to be used inside a <Dropdown/>");
  }
  return context;
};
The code defines a generic DropdownContextType kind, and a
createDropdownContext perform to create a context with this sort.
DropdownContext is created utilizing this perform.
useDropdownContext is a customized hook that accesses this context,
throwing an error if it is used exterior of a <Dropdown/>
element, guaranteeing correct utilization inside the desired element hierarchy.
Then we will outline elements that use the context. We are able to begin with the
context supplier:
const HeadlessDropdown = <T extends { textual content: string }>({
  kids,
  objects,
}: {
  kids: React.ReactNode;
  objects: T[];
}) => {
  const {
    //... all of the states and state setters from the hook
  } = useDropdown(objects);

  return (
    <DropdownContext.Supplier
      worth={{
        isOpen,
        toggleDropdown,
        selectedIndex,
        selectedItem,
        updateSelectedItem,
      }}
    >
      <div
        ref={dropdownRef as RefObject<HTMLDivElement>}
        {...getAriaAttributes()}
      >
        {kids}
      </div>
    </DropdownContext.Supplier>
  );
};
The HeadlessDropdown element takes two props:
kids and objects, and makes use of a customized hook
useDropdown to handle its state and conduct. It supplies a context
by way of DropdownContext.Supplier to share state and conduct with its
descendants. Inside a div, it units a ref and applies ARIA
attributes for accessibility, then renders its kids to show
the nested elements, enabling a structured and customizable dropdown
performance.
Word how we use useDropdown hook we outlined within the earlier
part, after which move these values all the way down to the kids of
HeadlessDropdown. Following this, we will outline the kid
elements:
HeadlessDropdown.Set off = perform Set off({
  as: Part = "button",
  ...props
}) {
  const { toggleDropdown } = useDropdownContext();

  return <Part tabIndex={0} onClick={toggleDropdown} {...props} />;
};

HeadlessDropdown.Listing = perform Listing({
  as: Part = "ul",
  ...props
}) {
  const { isOpen } = useDropdownContext();

  return isOpen ? <Part {...props} position="listbox" tabIndex={0} /> : null;
};

HeadlessDropdown.Possibility = perform Possibility({
  as: Part = "li",
  index,
  merchandise,
  ...props
}) {
  const { updateSelectedItem, selectedIndex } = useDropdownContext();

  return (
    <Part
      position="possibility"
      aria-selected={index === selectedIndex}
      key={index}
      onClick={() => updateSelectedItem(merchandise)}
      {...props}
    >
      {merchandise.textual content}
    </Part>
  );
};
We outlined a kind GenericComponentType to deal with a element or an
HTML tag together with any extra properties. Three capabilities
HeadlessDropdown.Set off, HeadlessDropdown.Listing, and
HeadlessDropdown.Possibility are outlined to render respective elements of
a dropdown menu. Every perform makes use of the as prop to permit customized
rendering of a element, and spreads extra properties onto the rendered
element. All of them entry shared state and conduct by way of
useDropdownContext.
HeadlessDropdown.Set offrenders a button by default that
toggles the dropdown menu.HeadlessDropdown.Listingrenders an inventory container if the
dropdown is open.HeadlessDropdown.Possibilityrenders particular person listing objects and
updates the chosen merchandise when clicked.
These capabilities collectively permit a customizable and accessible dropdown menu
construction.
It largely boils all the way down to consumer choice on how they select to make the most of the
Headless Part of their codebase. Personally, I lean in the direction of hooks as they
do not contain any DOM (or digital DOM) interactions; the only real bridge between
the shared state logic and UI is the ref object. Then again, with the
context-based implementation, a default implementation will probably be offered when the
consumer decides to not customise it.
Within the upcoming instance, I will exhibit how effortlessly we will
transition to a distinct UI whereas retaining the core performance with the useDropdown hook.
Adapting to a New UI Requirement
Contemplate a state of affairs the place a brand new design requires utilizing a button as a
set off and displaying avatars alongside the textual content within the dropdown listing.
With the logic already encapsulated in our useDropdown hook, adapting
to this new UI is easy.
Within the new DropdownTailwind element beneath, we have made use of
Tailwind CSS (Tailwind CSS is a utility-first CSS framework for quickly
constructing customized consumer interfaces) to fashion our components. The construction is
barely modified – a button is used because the set off, and every merchandise in
the dropdown listing now contains a picture. Regardless of these UI modifications, the
core performance stays intact, due to our useDropdown hook.
const DropdownTailwind = ({ objects }: DropdownProps) => {
  const {
    isOpen,
    selectedItem,
    selectedIndex,
    toggleDropdown,
    handleKeyDown,
    setSelectedItem,
  } = useDropdown<Merchandise>(objects);

  return (
    <div
      className="relative"
      onClick={toggleDropdown}
      onKeyDown={handleKeyDown}
    >
      <button className="btn p-2 border ..." tabIndex={0}>
        {selectedItem ? selectedItem.textual content : "Choose an merchandise..."}
      </button>

      {isOpen && (
        <ul
          className="dropdown-menu ..."
          position="listbox"
        >
          {(objects).map((merchandise, index) => (
            <li
              key={index}
              position="possibility"
            >
            {/* ... remainder of the JSX ... */}
            </li>
          ))}
        </ul>
      )}
    </div>
  );
};
On this rendition, the DropdownTailwind element interfaces with
the useDropdown hook to handle its state and interactions. This design
ensures that any UI modifications or enhancements don’t necessitate a
reimplementation of the underlying logic, considerably easing the
adaptation to new design necessities.
We are able to additionally visualise the code a bit higher with the React Devtools,
be aware within the hooks part, all of the states are listed in it:
Each dropdown listing, no matter its exterior look, shares
constant conduct internally, all of which is encapsulated inside the
useDropdown hook (the Headless Part). Nonetheless, what if we have to
handle extra states, like, async states when we now have to fetch information from
distant.
Diving Deeper with Further States
As we advance with our dropdown element, let’s discover extra
intricate states that come into play when coping with distant information. The
state of affairs of fetching information from a distant supply brings forth the
necessity to handle a couple of extra states – particularly, we have to deal with
loading, error, and information states.
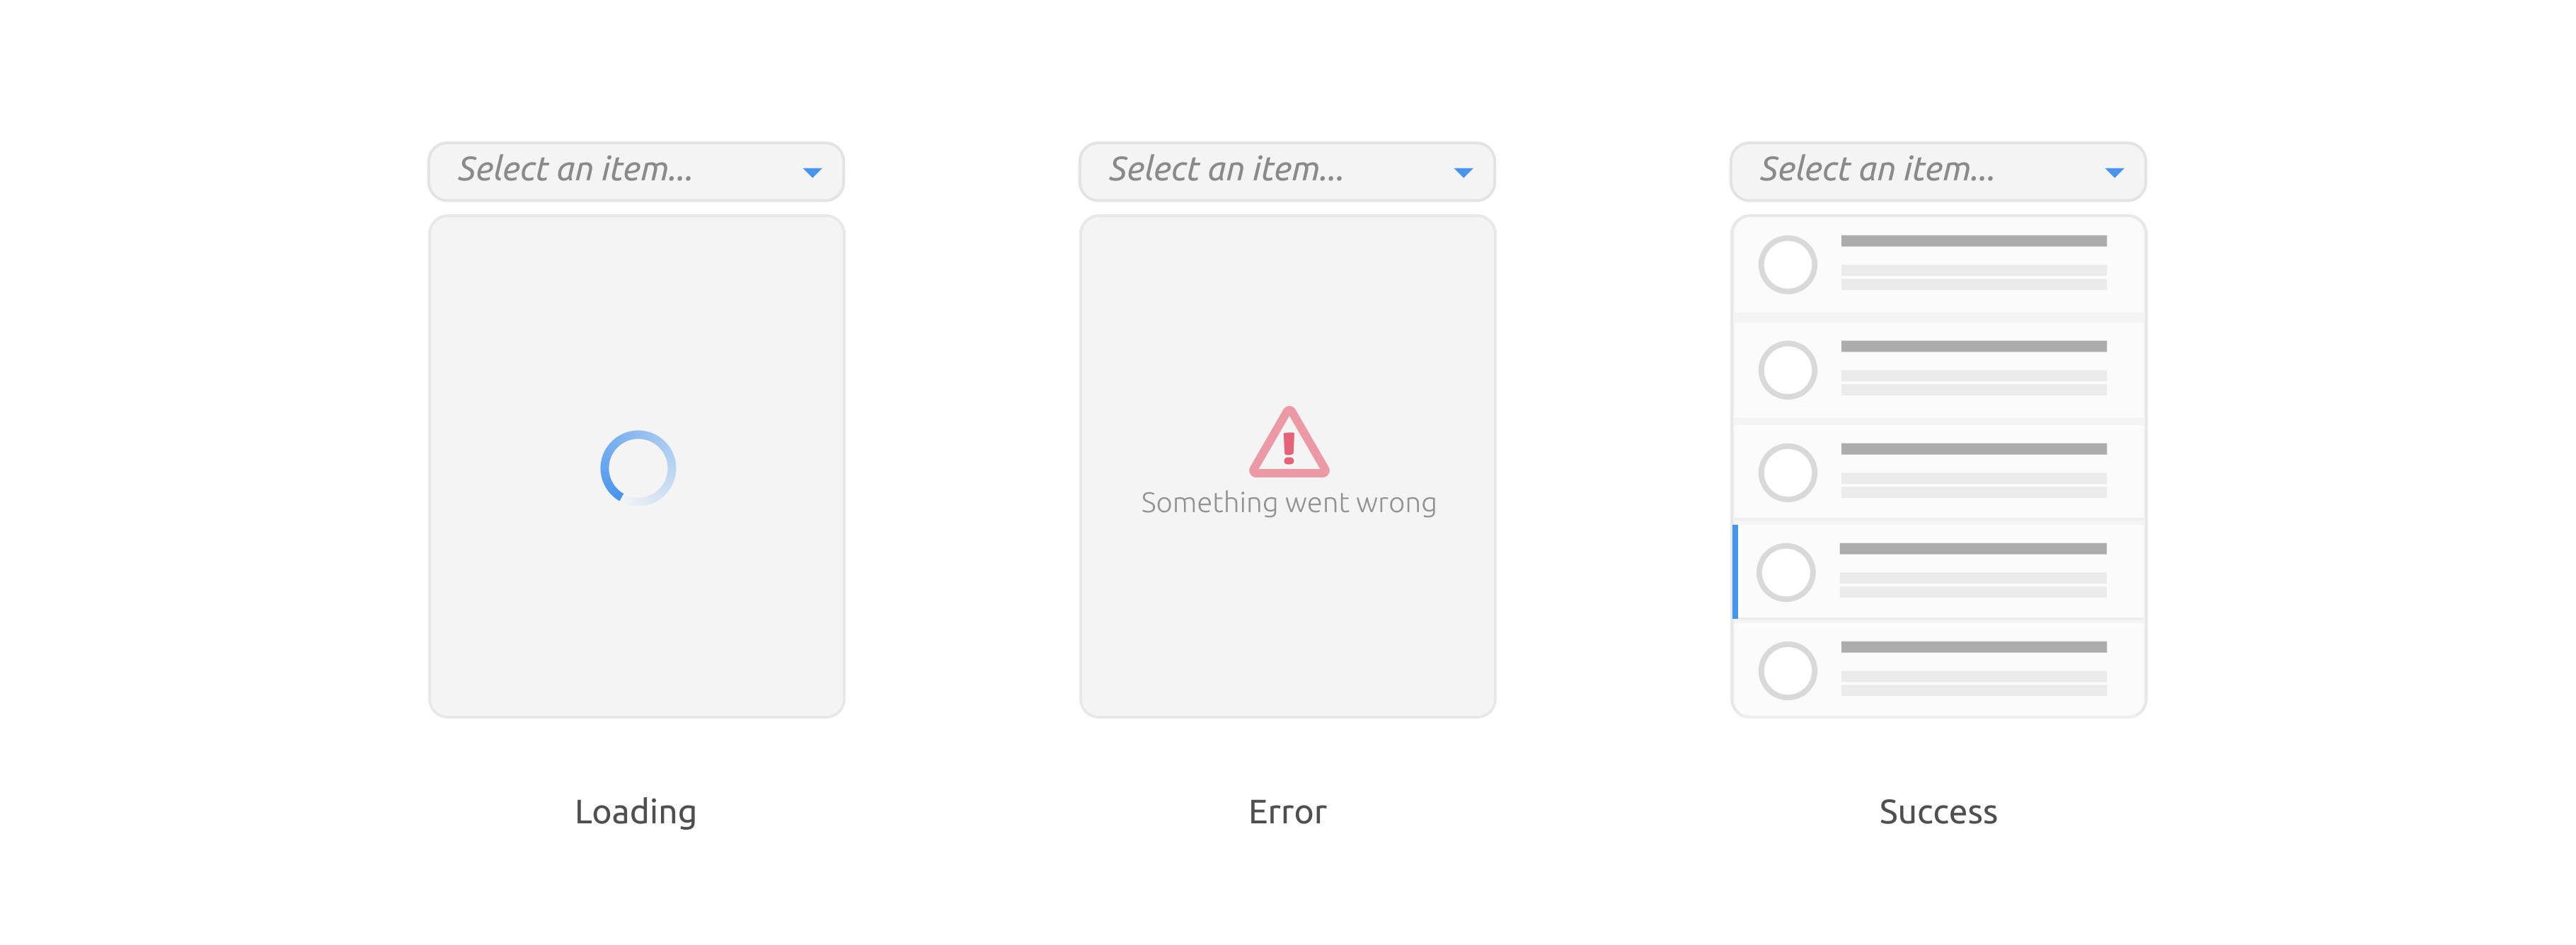
Determine 6: Completely different standing
Unveiling Distant Information Fetching
To load information from a distant server, we might want to outline three new
states: loading, error, and information. This is how we will go about it
usually with a useEffect name:
//...
  const [loading, setLoading] = useState<boolean>(false);
  const [data, setData] = useState<Merchandise[] | null>(null);
  const [error, setError] = useState<Error | undefined>(undefined);

  useEffect(() => {
    const fetchData = async () => {
      setLoading(true);

      strive {
        const response = await fetch("/api/customers");

        if (!response.okay) {
          const error = await response.json();
          throw new Error(`Error: $ response.standing`);
        }

        const information = await response.json();
        setData(information);
      } catch (e) {
        setError(e as Error);
      } lastly {
        setLoading(false);
      }
    };

    fetchData();
  }, []);

//...
The code initializes three state variables: loading, information, and
error. When the element mounts, it triggers an asynchronous perform
to fetch information from the “/api/customers” endpoint. It units loading to
true earlier than the fetch and to false afterwards. If the information is
fetched efficiently, it is saved within the information state. If there’s an
error, it is captured and saved within the error state.
Refactoring for Magnificence and Reusability
Incorporating fetching logic straight inside our element can work,
but it surely’s not probably the most elegant or reusable method. We are able to push the
precept behind Headless Part a bit additional right here, separate the
logic and state out of the UI. Let’s refactor this by extracting the
fetching logic right into a separate perform:
const fetchUsers = async () => {
  const response = await fetch("/api/customers");

  if (!response.okay) {
    const error = await response.json();
    throw new Error('One thing went fallacious');
  }

  return await response.json();
};
Now with the fetchUsers perform in place, we will take a step
additional by abstracting our fetching logic right into a generic hook. This hook
will settle for a fetch perform and can handle the related loading,
error, and information states:
const useService = <T>(fetch: () => Promise<T>) => {
  const [loading, setLoading] = useState<boolean>(false);
  const [data, setData] = useState<T | null>(null);
  const [error, setError] = useState<Error | undefined>(undefined);

  useEffect(() => {
    const fetchData = async () => {
      setLoading(true);

      strive {
        const information = await fetch();
        setData(information);
      } catch(e) {
        setError(e as Error);
      } lastly {
        setLoading(false);
      }
    };

    fetchData();
  }, [fetch]);

  return {
    loading,
    error,
    information,
  };
}
Now, the useService hook emerges as a reusable resolution for information
fetching throughout our utility. It is a neat abstraction that we will
make use of to fetch numerous varieties of information, as demonstrated beneath:
// fetch merchandise
const { loading, error, information } = useService(fetchProducts);
// or different kind of assets
const { loading, error, information } = useService(fetchTickets);
With this refactoring, we have not solely simplified our information fetching
logic but additionally made it reusable throughout totally different situations in our
utility. This units a stable basis as we proceed to reinforce our
dropdown element and delve deeper into extra superior options and
optimizations.
Sustaining Simplicity within the Dropdown Part
Incorporating distant information fetching has not sophisticated our Dropdown
element, due to the abstracted logic within the useService and
useDropdown hooks. Our element code stays in its easiest type,
successfully managing the fetching states and rendering the content material based mostly
on the information acquired.
const Dropdown = () => {
  const { information, loading, error } = useService(fetchUsers);

  const {
    toggleDropdown,
    dropdownRef,
    isOpen,
    selectedItem,
    selectedIndex,
    updateSelectedItem,
    getAriaAttributes,
  } = useDropdown<Merchandise>(information || []);

  const renderContent = () => {
    if (loading) return <Loading />;
    if (error) return <Error />;
    if (information) {
      return (
        <DropdownMenu
          objects={information}
          updateSelectedItem={updateSelectedItem}
          selectedIndex={selectedIndex}
        />
      );
    }
    return null;
  };

  return (
    <div
      className="dropdown"
      ref={dropdownRef as RefObject<HTMLDivElement>}
      {...getAriaAttributes()}
    >
      <Set off
        onClick={toggleDropdown}
        textual content={selectedItem ? selectedItem.textual content : "Choose an merchandise..."}
      />
      {isOpen && renderContent()}
    </div>
  );
};
On this up to date Dropdown element, we make the most of the useService
hook to handle the information fetching states, and the useDropdown hook to
handle the dropdown-specific states and interactions. The
renderContent perform elegantly handles the rendering logic based mostly on
the fetching states, guaranteeing that the proper content material is displayed
whether or not it is loading, an error, or the information.
Within the above instance, observe how the Headless Part promotes
unfastened coupling amongst elements. This flexibility lets us interchange elements
for various combos. With shared Loading and Error elements,
we will effortlessly craft a UserDropdown with default JSX and styling,
or a ProductDropdown utilizing TailwindCSS that fetches information from a
totally different API endpoint.
Concluding the Headless Part Sample
The Headless Part sample unveils a strong avenue for cleanly
segregating our JSX code from the underlying logic. Whereas composing
declarative UI with JSX comes naturally, the true problem burgeons in
managing state. That is the place Headless Parts come into play by
shouldering all of the state administration intricacies, propelling us in the direction of
a brand new horizon of abstraction.
In essence, a Headless Part is a perform or object that
encapsulates logic, however doesn’t render something itself. It leaves the
rendering half to the patron, thus providing a excessive diploma of
flexibility in how the UI is rendered. This sample could be exceedingly
helpful when we now have complicated logic that we need to reuse throughout totally different
visible representations.
perform useDropdownLogic() {
  // ... all of the dropdown logic
  return {
    // ... uncovered logic
  };
}

perform MyDropdown() {
  const dropdownLogic = useDropdownLogic();
  return (
    // ... render the UI utilizing the logic from dropdownLogic
  );
}
Headless Parts provide a number of advantages, together with enhanced
reusability as they encapsulate logic that may be shared throughout a number of
elements, adhering to the DRY (Don’t Repeat Your self) precept. They
emphasize a transparent separation of considerations by distinctly differentiating
logic from rendering, a foundational apply for crafting maintainable
code. Moreover, they supply flexibility by permitting builders to
undertake different UI implementations utilizing the identical core logic, which is
significantly advantageous when coping with totally different design
necessities or working with numerous frameworks.
Nonetheless, it is important to method them with discernment. Like several
design sample, they arrive with challenges. For these unfamiliar, there
is likely to be an preliminary studying curve that might quickly decelerate
growth. Furthermore, if not utilized judiciously, the abstraction
launched by Headless Parts would possibly add a degree of indirection,
doubtlessly complicating the code’s readability.
I would like to notice that this sample could possibly be relevant in different
frontend libraries or frameworks. For example, Vue refers to this
idea as a renderless element. It embodies the identical precept,
prompting builders to segregate logic and state administration right into a
distinct element, thereby enabling customers to assemble the UI round
it.
I am unsure about its implementation or compatibility in Angular or
different frameworks, however I like to recommend contemplating its potential advantages in
your particular context.
Revisiting the basis patterns in GUI
In the event you’ve been within the business lengthy sufficient, or have expertise with GUI functions in a
desktop setup, you will seemingly acknowledge some familiarity with the Headless Part
sample—maybe beneath a distinct identify—be it View-Mannequin in MVVM, Presentation
Mannequin, or different phrases relying on
your publicity. Martin Fowler offered a deep dive into these phrases in a complete
article a number of years in the past, the place he clarified
many terminologies which were broadly used within the GUI world, corresponding to MVC,
Mannequin-View-Presenter, amongst others.
Presentation Mannequin abstracts the state and conduct of the view right into a mannequin class
inside the presentation layer. This mannequin coordinates with the area layer and supplies
an interface to the view, minimizing decision-making within the view…
However, I imagine it is necessary to broaden a bit on this established sample and
discover the way it operates inside the React or front-end world. As expertise evolves, a few of
the challenges confronted by conventional GUI functions could now not maintain relevance,
rendering sure obligatory components now elective.
For example, one cause behind separating the UI and logic was the problem in testing
their mixture, particularly on the headless CI/CD environments.
Thus, we aimed to extract as a lot as doable into UI-less code to ease the testing course of. Nonetheless, this
is not a big concern in React and lots of different net frameworks. For one, we now have sturdy
in-memory testing mechanisms like jsdom to check the UI behaviour, DOM manipulations,
and so forth. These exams could be run in any surroundings, like on headless CI/CD servers, and we
can simply execute actual browser exams utilizing Cypress in an in-memory browser (headless
Chrome, for instance)—a feat not possible for Desktop functions when MVC/MVP was
conceived.
One other main problem MVC confronted was information synchronization, necessitating Presenters, or
Presentation Fashions to orchestrate modifications on the underlying information and notify different
rendering elements. A traditional instance of the is illustrated beneath:
Determine 7: One mannequin has a number of displays
Within the illustration above, The three UI elements (desk, line chart and heatmap) are
solely impartial, however all of them are rendering the identical mannequin information. While you modified
information from desk, the opposite two graphs will probably be refreshed. To have the ability to detect the change,
and apply the change to refresh correpondingly elements, you have to setup occasion
listener manually.
Nonetheless, with the appearance of unidirectional information stream, React (together with many different trendy
frameworks) has cast a distinct path. As builders, we now not want to observe
mannequin modifications. The basic thought is to deal with each change as a complete new occasion, and
re-render all the pieces from scratch – It is essential to notice that I am considerably simplifying
your complete course of right here, overlooking the digital DOM and the differentiation and
reconciliation processes – implying that inside the codebase, the requirement to register
occasion listeners to precisely replace different segments put up mannequin alterations has been
eradicated.
In abstract, the Headless Part does not intention to reinvent established UI patterns; as a substitute,
it serves as an implementation inside the component-based UI structure. The precept of
segregating logic and state administration from views retains its significance, particularly in
delineating clear obligations and in situations the place there’s a possibility to substitute
one view for an additional.
Understanding the neighborhood
The idea of Headless Parts is not novel, it has existed for
a while however hasn’t been broadly acknowledged or integrated into
tasks. Nonetheless, a number of libraries have adopted the Headless Part
sample, selling the event of accessible, adaptable, and
reusable elements. A few of these libraries have already gained
vital traction inside the neighborhood:
- React ARIA: A
library from Adobe that gives accessibility primitives and hooks for
constructing inclusive React functions. It presents a set of hooks
to handle keyboard interactions, focus administration, and ARIA annotations,
making it simpler to create accessible UI elements. - Headless UI: A totally unstyled,
totally accessible UI element library, designed to combine fantastically
with Tailwind CSS. It supplies the conduct and accessibility basis
upon which you’ll construct your personal styled elements. - React Desk: A headless
utility for constructing quick and extendable tables and datagrids for React.
It supplies a versatile hook that lets you create complicated tables
with ease, leaving the UI illustration as much as you. - Downshift: A minimalist
library that will help you create accessible and customizable dropdowns,
comboboxes, and extra. It handles all of the logic whereas letting you outline
the rendering side.
These libraries embody the essence of the Headless Part sample
by encapsulating complicated logic and behaviors, making it easy
to create extremely interactive and accessible UI elements. Whereas the
offered instance serves as a studying stepping stone, it is prudent to
leverage these production-ready libraries for constructing sturdy,
accessible, and customizable elements in a real-world state of affairs.
This sample not solely educates us on managing complicated logic and state
but additionally nudges us to discover production-ready libraries which have honed
the Headless Part method to ship sturdy, accessible, and
customizable elements for real-world use.
Abstract
On this article, we delve into the idea of Headless Parts, a
typically missed sample in crafting reusable UI logic. Utilizing the
creation of an intricate dropdown listing for instance, we start with a
easy dropdown and incrementally introduce options corresponding to keyboard
navigation and asynchronous information fetching. This method showcases the
seamless extraction of reusable logic right into a Headless Part and
highlights the benefit with which we will overlay a brand new UI.
Via sensible examples, we illuminate how such separation paves
the way in which for constructing reusable, accessible, and tailor-made elements. We
additionally highlight famend libraries like React Desk, Downshift, React
UseGesture, React ARIA, and Headless UI that champion the Headless
Part sample. These libraries provide pre-configured options for
creating interactive and user-friendly UI elements.
This deep dive emphasizes the pivotal position of the separation of
considerations within the UI growth course of, underscoring its significance in
crafting scalable, accessible, and maintainable React functions.